about.rt-541.io / projects / spool cabinet3D model · PDF
Shop drawing set

Basement Spool Cabinet

A sealed plywood cabinet one IKEA BILLY wide, with two OXBERG tempered-glass doors, that rests at 10 to 20 percent humidity on desiccant alone. 56 spools on edge in cradle rails, seven per row at 4 in pitch, two rows deep, plus cubby overflow. Pocket-screwed from three sheets of 3/4 plywood; drying is done in a bought box dehydrator, not in the cabinet.
LocationBasement, MI
RevisionD.1, 2026-09-13
Cabinet31.5 W x 76 H x 18.75 D
Doors2 OXBERG glass, 15.5 x 75.75
Capacity56 on rails + 18 flat
Rough cost$450 pine, $550 birch

Design basis

Sheet 01 of 06

What was decided

  • Two jobs, two boxes. The cabinet is airtight and passive and you build it. Drying happens in a box food dehydrator you buy used: it reaches 70 C with fan airflow and a timer, which is everything the heater box on the earlier revisions did, for $25 to $100.
  • One plywood case, one bay. 31.5 in wide, 76 in tall on a 3.5 in plinth, 18.75 in deep: the width of an IKEA BILLY, so it takes a pair of OXBERG glass doors with their own hinges. A fixed 1x3 center stile at the front carries the seal where the doors meet.
  • Spools stand on edge in cradle rails, two rows deep, seven per row at a 4 in pitch, back row on a 2.5 in riser so its rim stands 1.75 in above the front row and you lift it out by the rim. 56 on rails; the cubby at the top takes up to 18 more laid flat.
  • Shelves are fixed and pocket-screwed into the sides. No adjustable standards. At a 30 in span the 3/4 in shelf with its 2x3 risers needs no apron.
  • Seal: EPDM bulb weatherstrip on the case edges and the center stile, with two magnetic catches per door. A made-to-size magnetic refrigerator gasket is the upgrade if the flashlight test or the hygrometer says the bulb seal leaks.

Assumptions

  • 1 kg spool: 200 mm (8 in) diameter, up to 75 mm (3 in) wide. That width sets the 4 in pitch.
  • 2 kg spool: 200 mm diameter, up to 140 mm (5.5 in) wide. One takes two slots on the rails; the dehydrator takes one at a time.
  • Basement air: about 65 F. Summer 60 to 70 percent humidity, winter 30 to 40 percent.
  • Tools on hand: miter saw, circular saw, drill, brad nailer, pocket hole jig. No router or table saw assumed.
  • Shelf is PLA and PETG with some TPU. Nothing that needs more than 70 C to dry.
Why the storage cabinet needs no heater

Heat does not remove water, it only changes the humidity reading. Summer basement air carries about 10 g of water per cubic meter. Warmed to 35 C it reads 25 percent, at 40 C it reads 20 percent, at 45 C it reads 15 percent, and you pay 150 to 250 W around the clock for that. A sealed cabinet with 10 lb of silica gel sits at 10 to 15 percent at basement temperature for free. Every door opening lets in roughly 3 g of water, so the gel needs an oven recharge every few weeks in summer and every month or two in winter.

Why a dehydrator and not a heater box

The heater box on revisions A to C cost about $270 in parts and a day of wiring to reach 65 C with a fan and a thermostat. A box food dehydrator is that same thing with a warranty: 35 to 74 C in 1 degree steps, rear fan, 48 hour timer, and it exhausts the moist air instead of trapping it. With the trays out a six-tray unit holds three 1 kg spools on edge or one 2 kg; a ten-tray unit holds four or two. Used ones run $25 to $100. So the dryer is a purchase, and this drawing set is only the cabinet.

Interior30 x 74.5 x 18
Rows at 14 in pitch4 rows, 14 per shelf, 56
Shelves4 fixed + 1 cubby, all 3/4
Doors2 OXBERG glass, 15.5 x 75.75
SealEPDM bulb + magnetic catches
Loaded weightabout 250 lb full

Cabinet drawings Passive, sealed

Sheet 02 of 06
31.5 in 76 in cubby 11.75 in gel pan 5 lb fan 14 in 6 in 11.75 30 in inside 1x3 stile,doors meet Front elevation, doors open. Dashed = back row.
Front elevation. One 30 in bay, four rows of fourteen spools each on fixed shelves pocket-screwed into the sides. Spools sit with their axis along the rails, so from the front you see each one edge-on, 3 in wide by 8 in tall, at a 4 in pitch; the dashed outlines are the back row standing 1.75 in taller behind the front row, which is the edge you grab. The bottom 6 in holds the silica gel pan and the fan; the top 11.75 in is a cubby for overflow spools laid flat. The two doors close against the fixed center stile.
19.5 in with door gel tray, fan 14 in shelf 17 in, 1 in gap at back shelves pocket-screwedinto the sides gasket on case edge OXBERG glass door, 3/4 in frame
Side section, door on the left. Each shelf has two flat 1x2 rails for the front spool and two 2x3 risers on edge for the back spool. Shelves are fixed with three pocket screws per end into the sides. The door is an OXBERG glass door overlaying the case front; the EPDM bulb seal sits on the case edge.
1.5 6.5 10 15 2.5 Front row: two 1x2 flat rails, glued and brad nailed. Back row: two 2x3 on edge, glued, 2 in screws from below. Spool sinks 0.9 in between rails, so it cannot roll. Pitch 4 in across, 7 per row. Shelf detail, inches from front edge
Shelf detail. Rail positions are measured from the front edge of the shelf. The back spool's top edge stands 1.75 in above the front spool's, which is what you grab. At a 30 in span the 3/4 in shelf with two 2x3 risers glued on edge needs no apron.

3D model

The drawing-set numbers also build a CadQuery model. Orbit it, open the doors, strip it to the shell and toggle components in the interactive viewer. Its checks (spool pitch against the bay, back-row rim height, spool clearance under the next shelf, the OXBERG pair against the case width, height under the basement ceiling) run on every rebuild.

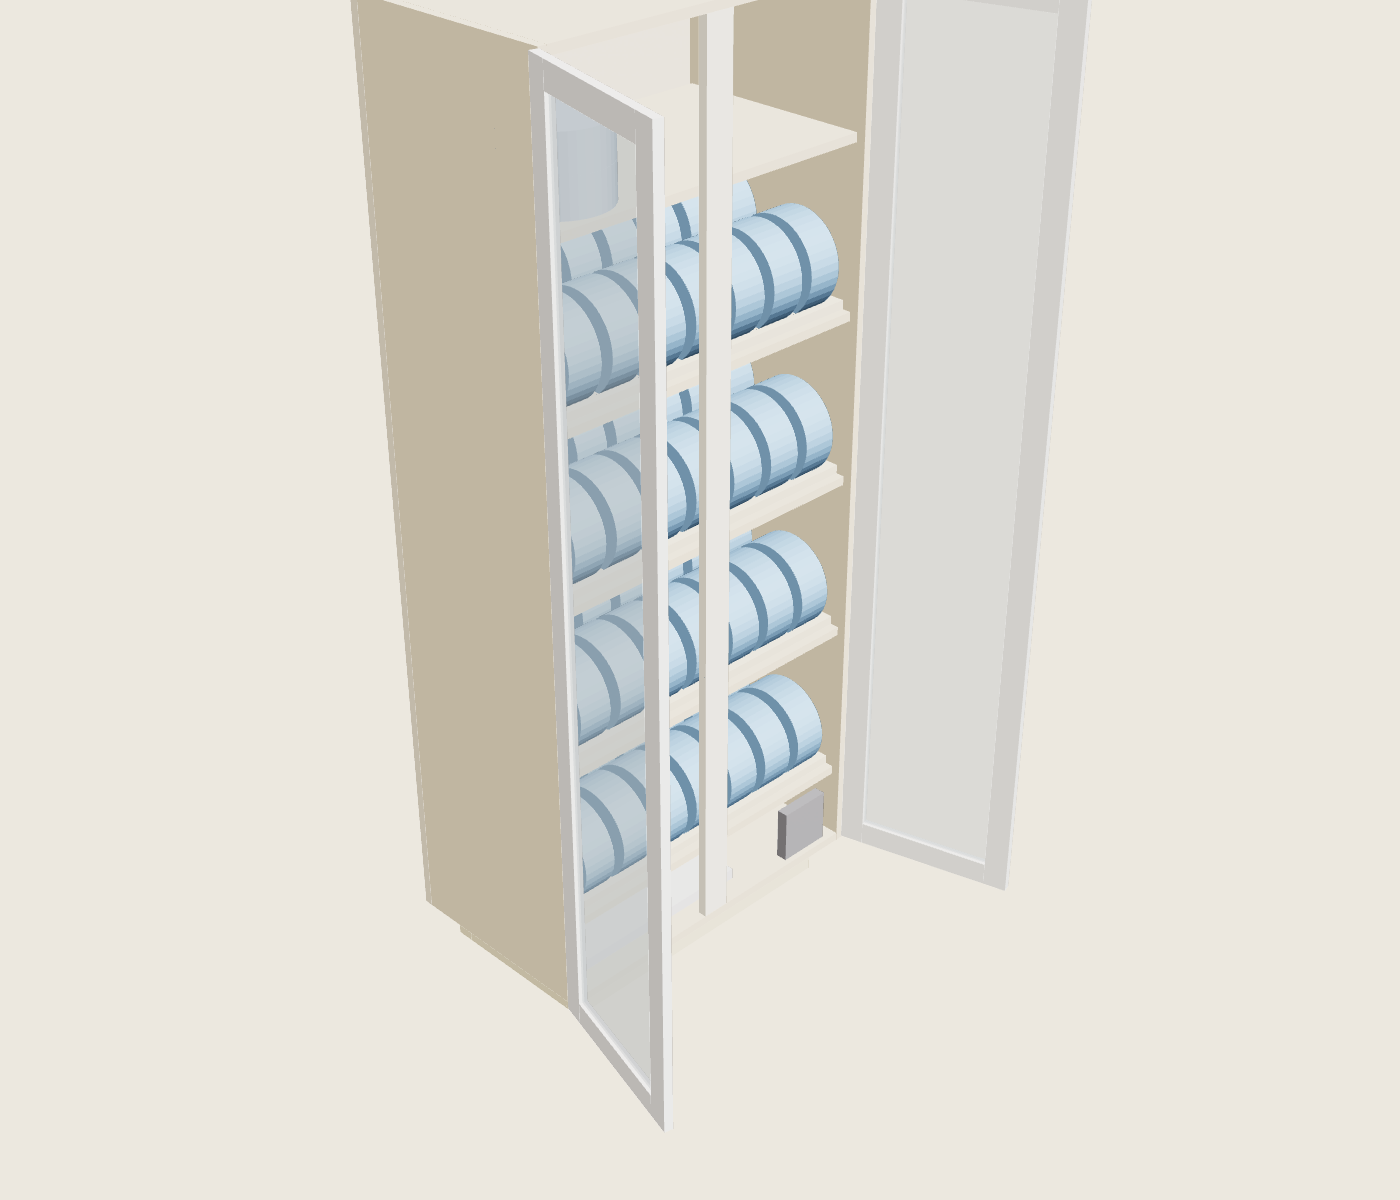
Render of the cabinet with both glass doors open
Doors open: four shelves of fourteen spools on cradle rails, back row on risers, gel pan and fan on the floor, overflow flat in the cubby.
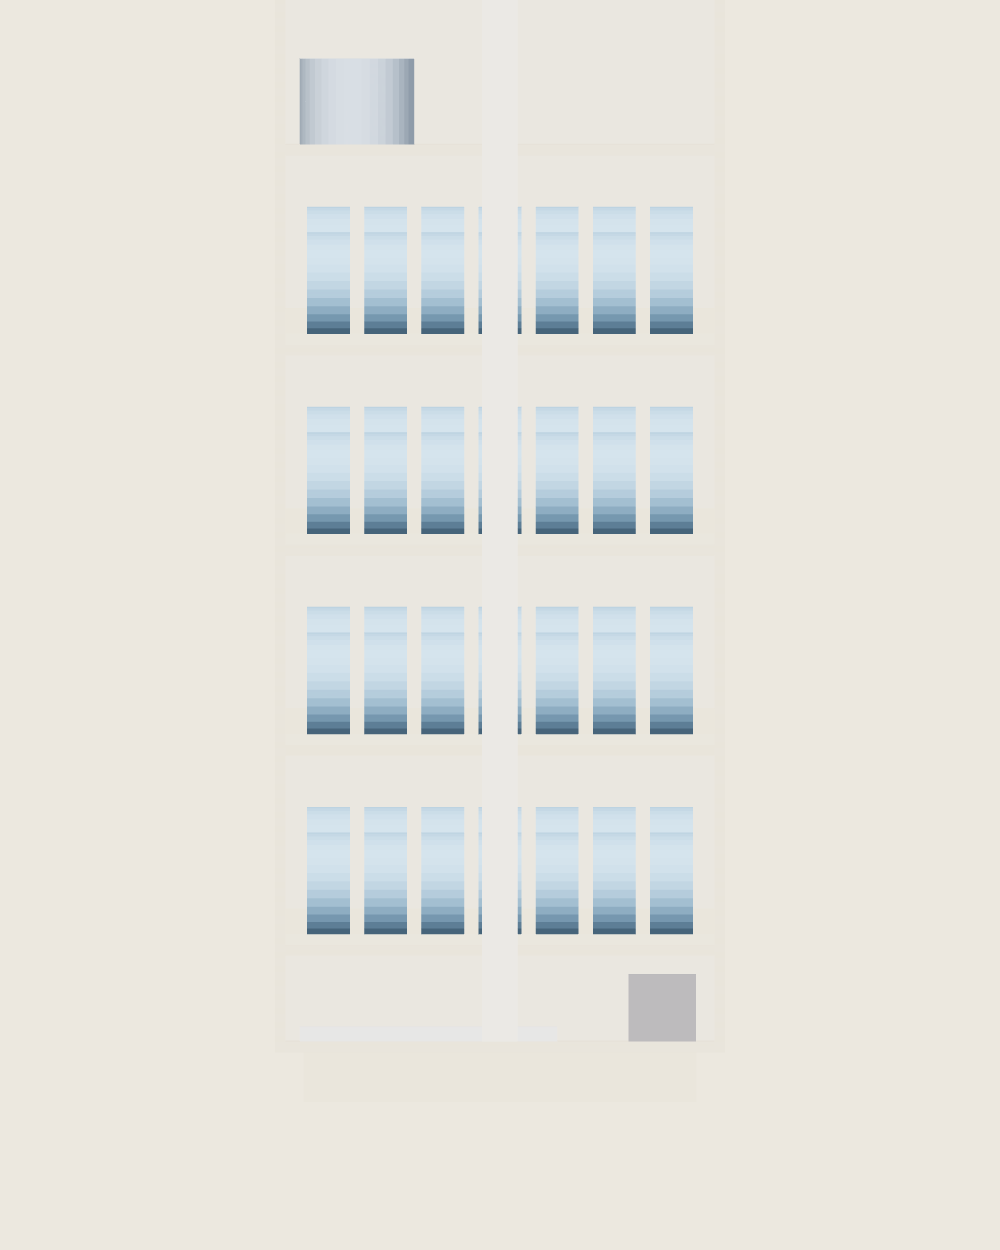
Orthographic front render with the doors removed, spools seen edge-on
Straight-on with the doors removed. Spools read edge-on from the front, the back row standing 1.75 in taller than the front row.

Carcass

  • 3/4 in plywood throughout: sides 18 x 76, top and bottom 30 x 18 between the sides, four shelves and one cubby shelf 30 x 17, back 31.5 x 76 overlaying sides, top and bottom, glued and screwed every 6 in.
  • Pocket screws throughout: Kreg jig at the 3/4 in setting, 1-1/4 in coarse screws, glue in every joint. Top and bottom into the sides with pockets on their hidden faces; each shelf into the sides with three pockets per end on its underside. Run a bead of clear silicone along every interior seam after assembly and over any pocket that faces inward.
  • Fixed shelves, bottoms at 6, 20, 34 and 48 in above the case floor; the cubby shelf at 62 in. Fixed shelves tie the sides together, so the case is rigid before the back goes on.
  • Two coats of dewaxed shellac on every interior face, applied flat before assembly since fixed shelves make the inside corners hard to reach. Bare plywood soaks up and releases water for weeks; sealed plywood does not. Cure 3 days with doors open before loading gel.
  • Center stile: 1x3 poplar, 74.5 long, glued and pocket-screwed between top and bottom at the front, flush with the case edges. It gives the two doors 1.25 in each to close against and carries their seal.
  • Plinth: 2x4 frame 27.5 x 15, pocket-screwed with 2-1/2 in coarse screws, set back 2 in at the front. Two L-brackets from the top rear into studs. Loaded weight is about 250 lb with 56 spools and it is 6 ft 8 in tall.

Doors and seal

  • Two OXBERG glass doors, 15.5 x 75.75 in, 4 mm tempered glass in a 3/4 in fiberboard frame, concealed hinges and knobs included, $50 each. Glass is as good a vapor barrier as acrylic and it does not creep, craze or need screws through it.
  • Overlay: the doors hinge on the sides and meet over the center stile with a 1/8 in gap, covering the 31.5 in case the way they cover a BILLY. Door height 75.75 against the 76 in case leaves 1/8 in top and bottom.
  • Hinges: the 35 mm cups are already bored in the doors. Hang each mounting plate on its hinge, hold the door closed in position with the reveals set, mark the two plate screw holes on the side, drill 5 mm, drive the included Euro screws. Adjust the hinge in and out until the door just kisses the seal all the way round.
  • Seal, default: Frost King V25BK 5/16 x 1/4 in EPDM D-section on the case front edges and both faces of the center stile, not on the door. The hollow bulb seals with almost no closing force. Two magnetic catches per door, 11 to 20 lb, at 12 in from the top and bottom on the stile side, plates on the back of the door. The OXBERG hinges are self-closing and the magnets hold the door onto the bulb.
  • Seal, upgrade: a made-to-size magnetic refrigerator gasket on each door's back perimeter ($45 a door) pulling onto 3/4 in perforated galvanized hanger strap glued along the case edges and the stile. That is a fridge door. Fit it only if the flashlight test shows light or the cabinet will not hold under 20 percent.
  • One 3/8 in hole at the bottom back corner for the fan's USB cable, filled with silicone after.

Desiccant and monitoring

  • One half-sheet aluminum pan, 13 x 18, holding 5 lb of orange indicating silica gel spread 1 in deep. Surface area matters more than depth. A second 5 lb bag on the cubby shelf halves the recharge interval if you open the doors a lot.
  • A 120 mm USB fan on the floor blowing across the pan, running always. Moving air makes the gel work several times faster than still air. Draw is under 2 W.
  • One hygrometer at mid height, readable through the glass. A Bluetooth one with phone alerts warns you when it climbs past 20 percent.
  • Recharge the gel when the beads turn green or the reading passes 20 percent: spread on the pan, 250 F in the oven for 2 to 3 hours until orange again. Expect every 3 to 5 weeks in summer, 2 months in winter.

Cut list

Sheet 03 of 06

Three sheets of 3/4 in plywood. Dimensions are width by height in inches; grain runs along the second number where it matters. Have the store rip the 18 in strips if you do not have a track saw; a Home Depot panel saw gets within 1/8 in, which is fine for sides and the back.

SheetPartQtySizeNotes
ASides218 x 76Drill shelf, top and bottom pocket holes before assembly.
AShelf130 x 17From the 36 x 20 end.
BTop, bottom230 x 18From the 18 in wide column.
BShelves430 x 17Three spool shelves and the cubby shelf, from the 30 in wide column. One spare fits too.
CBack131.5 x 76Overlays sides, top and bottom.
A, COffcut strips212 x 96, 16.5 x 96Spare. Corner blocks, a jig fence, future cleats.
Solid stockQtyCut toUse
1x3 poplar, 8 ft174.5Center stile
1x2 furring, 8 ft830Front cradle rails, 2 per shelf (3 per board, 3 boards). Pick straight ones.
2x3 SPF, 8 ft830Back risers, 2 per shelf (3 per board, 3 boards)
2x4, 8 ft127.5, 27.5, 12, 12, 12Plinth frame 27.5 x 15 (two rails, three crosspieces)

Shopping list

Sheet 04 of 06

Prices checked 2026-09-13 against the retailers' listed prices. Home Depot, Lowe's and Menards show store pricing only once a store is selected in a browser, so treat the lumber and plywood figures as the posted price and expect the Utica and Shelby Township stores to be within a few dollars. Amazon and direct-site prices were read live. IKEA is Canton, about 50 miles, or ship to home.

ItemQtyEachTotalWhere
3/4 in x 4 x 8 BC sanded pine plywood (Plytanium)3$50$150Home Depot. PureBond birch is $83 a sheet if you want it flatter and prettier: +$99.
OXBERG glass door, 15.5 x 75.75, hinges and knob included2$50$100IKEA. Panel door $45 or HĂ–GBO aluminum-frame glass $65 are the same size.
1x3 x 8 ft poplar1$15.25$15.25Home Depot
1x2 x 8 ft furring strip3$1.38$4.14Lowe's. Select pine is $6.98 a board if you want knot-free rails.
2x3 x 8 ft stud3$2.98$8.94Lowe's
2x4 x 8 ft stud1$4.25$4.25Home Depot
Kreg 1-1/4 in coarse pocket screws, 2501$24.47$24.47Home Depot. About 100 are used.
Kreg 2-1/2 in coarse pocket screws, 501$6.99$6.99Home Depot
Titebond II, 16 oz1$8.49$8.49Home Depot
DAP Silicone Max clear, 10.1 oz1$13.59$13.59Home Depot
Zinsser SealCoat dewaxed shellac, quart1$21.99$21.99Amazon. Home Depot only sells it by the case online; Ace has it at $24.99.
Frost King V25BK EPDM D-section 5/16 x 1/4 in, 17 ft2$7.94$15.88Home Depot. Case edges plus both faces of the stile need about 30 ft.
Everbilt 11 lb magnetic catch with plate4$2.38$9.52Home Depot. Or a 20 lb neodymium 6-pack at $13.99 on Amazon.
Orange indicating silica gel, 5 lb1$21.99$21.99Dry and Dry direct; $27.99 on Amazon. A second bag is optional.
Nordic Ware half-sheet pan 13 x 181$17.74$17.74Amazon; the 2-pack is $29.70
120 mm 5 V USB fan (ELUTENG or AC Infinity S3)1$9.99$9.99Amazon. Runs off any phone charger.
Govee H5075 Bluetooth hygrometer1$12.99$12.99Amazon. ThermoPro TP49 2-pack is $15.99 without Bluetooth.
L-brackets or anti-tip straps2$3$6Home Depot, not price-checked
Cabinet total about $450 in pine. About $550 in birch. Fridge-gasket seal upgrade adds $92 for two made-to-size gaskets plus about $10 of hanger strap. The dehydrator is a separate used purchase, $25 to $100.

Build sequence

Sheet 05 of 06

Case

  1. Break down sheets A to C to the cut list. Label every part and mark which face is inside.
  2. Everything flat on the bench. Drill the pocket holes: three per end on the underside of each shelf, along the hidden faces of top and bottom, and two at each end of the center stile. Glue and brad the 1x2 rails and glue and screw the 2x3 risers from below on all four spool shelves. Mark the shelf lines on both sides at 6, 20, 34, 48 and 62 in above the bottom panel.
  3. Two coats of shellac on every interior face while it is still flat: sides, top, bottom, back and the shelf assemblies. Let it dry overnight.
  4. Lay one side flat. Glue and pocket-screw the bottom and top to it, then the five shelves, square to the marks. Bring the second side down onto the assembly and pocket-screw it the same way. Check diagonals.
  5. Glue and pocket-screw the center stile in at the front, flush with the case edges. Glue and screw the back on, screws every 6 in. The back squares the box.
  6. Silicone every interior seam, including the shelf ends and the back, and any pocket that faces inward. Leave the box open to cure for 3 days.
  7. Build the plinth, set the case on it, screw down through the bottom. Stand it in place and anchor the top rear to a stud.

Doors and seal

  1. Apply the EPDM D-section to the case front edges and both faces of the center stile. Butt the corners; do not stretch it.
  2. Unbox the OXBERG doors and clip the hinge arms into their cups. Hang a mounting plate on each hinge.
  3. Hold the left door closed in position: 1/8 in reveal at top and bottom, its outer edge flush with the case side. Mark the plate holes through the plates, swing the door away, drill 5 mm, drive the Euro screws. Repeat for the right door.
  4. Adjust each hinge in and out until the door just compresses the bulb all the way round with no gap at the corners. Fit two magnetic catches per door on the stile side, plates on the door back.
  5. Flashlight test: close the doors, kill the lights, and shine a flashlight around the door edges from inside. Any light is a leak; adjust the hinge or add a second layer of D-section there.
  6. Gel pan and fan in, cable through the 3/8 in hole, silicone the hole, hygrometer at mid height. Close it. It should read under 20 percent within 48 hours and under 15 within a week as the plywood finishes giving up water. If it stalls above 20, that is when you order the fridge gaskets.

Operating guide

Sheet 06 of 06
Material, in the dehydratorSet CHoursNotes
PLA506Never higher; spools fuse near 55
TPU556 to 8Soft TPU 50
PETG656 to 8
ABS, ASA704 to 6Top of a dehydrator dial
PA6, PA12, PC blends7010 to 12Marginal; 80 would be ideal and no dehydrator reaches it
Wet 2 kg spool, anyas above+50%Twice the mass, same surface
Dehydrator: trays out except the bottom one, spools on edge, a hygrometer inside on the first run to check the dial. Set the timer for the hours above; the spool is done when the hygrometer next to it reads under 10 percent.

Routine

  • New filament: a dehydrator cycle first, then into the cabinet. Never put a fresh spool from a shipping bag into the cabinet; its water goes straight into your gel.
  • Printing: pull from the cabinet and print. PLA and PETG that sit under 20 percent stay printable for months. Nylon needs the dehydrator on its top setting and a long cycle.
  • Cabinet reads over 20 percent: recharge the gel. If it climbs within a week of a recharge, check the bulb seal with a flashlight from inside and re-silicone the fan cable hole.
  • Dehydrator dial: a kitchen dial can read 5 C off. Trust the hygrometer inside it and the marks you made on the first run, not the printed numbers.
Running numbersValueBasis
Cabinet electricity2 WOne USB fan
Cabinet air volume23 cu ft30 x 74.5 x 18 in
Water per door opening, summer~2 gThird of the volume exchanged at 10 g per cubic meter
Usable gel capacity at 20 percent~225 g5 lb silica gel at 10 percent by weight; about 100 door openings
Dehydrator energy per 8 h cycle~2 kWh600 W element at about 40 percent duty; about 35 cents

Revision D.1 (2026-09-13): trimmed to one BILLY-width bay after the spool pitch correction showed that seven spools per row at 4 in pitch, two rows deep, gives 56 on rails in a single 30 in bay, more than the 40 the design started from. Revision D: OXBERG glass doors, heater box dropped for a bought dehydrator, price-checked shopping list. Revision C: fixed pocket-screwed shelves. Revision B: dryer lowered to 65 C. Revision A: 4x6 acrylic-door cabinet plus 75 C heater box.